Dave Brown
Firearms Safety Specialist
As published in Blue Line Enforcement Magazine
The Threat Indexed Presentation from the Holster
A T.I.P to get your sights on target faster!
by Dave Brown
“In the real world, people are not sheep and police officers are not sheepdogs; they only do the best job they can with the training they have received.”
Police firearms training has come a long way in the past twenty years.
There is a much better understanding of the physiology of the human body under stress and how that must be integrated into police training. There are better methods of training, better holsters, better force-on-force training and more emphasis on real-life practical scenarios. At the end of the day, though, there is still a need to teach a skill that we hope officers never need to use but which we must make an automatic reaction in the middle of a life-threatening situation.
Officers must be able to immediately place their shots centre-mass in a way that quickly and effectively neutralizes a deadly threat in order to protect their lives or the lives of the citizens they are hired to protect. When confronted by an immediate threat to human life, stopping that threat in the quickest and most efficient way possible means others get to make it home safely to their loved ones.
When that deadly threat is immediate, there are no magical new intermediate force weapons or mythical bullets that can stop that threat instantly. The human body has a well-developed survival mechanism and this is why there is no such thing as instant incapacitation for street officers. The keys to survival are shot placement and shot penetration.
Deadly force is never pretty to discuss. It involves firing a round into the centre-mass of a human body in a way that penetrates deep enough to cause the threat to human life to stop as quickly as possible. The sad fact is that death may be a likely consequence of this action, but is not the desired result. The intent is exclusively to STOP THE THREAT. Consequences are initiated solely by the subject.
Even if a shot to an extremity could be possible in a highly dynamic situation, it would neither be legally justified, nor would it even work to stop a threat. It would result in little effect. In high stress situations, blood flow virtually stops to the extremities to better protect the human body. This is known as the “fight-or-flight” syndrome, and this is coupled with a massive introduction of a natural painkiller called adrenalin into the human body. (This is what gives highly-agitated persons almost superhuman strength, and why it can take six or eight trained police officers to control one angry subject.)
It is thus not humanly possible to “shoot the knife out of someone’s hand” and any shot that hit an arm or a leg would be unfelt, and the threat would continue with even a MUCH greater immediate threat to those lives.
The Survival Instinct
The body is capable of almost instantly adapting to extreme circumstances. The evolution of natural self-protection mechanisms of the human body forms common and predictable physiological and psychological reactions to sudden stress are factored into modern police weapons training.
For example, one common response to sudden stress is the sharpening of focus in the critical central area of vision. The body has the ability to reshape the eyeball physically, resulting in enhanced focus in the center. The cost of this, however, is a loss of peripheral vision, referred to as “tunnel vision.” This is why an important part of every police firearms training exercise is to conclude with a ‘scan’ to the left and right for further threats.
Another drawback to this tunnel vision effect is that the brain does not perceive the vision as sharper than normal; the brain perceives the objects that the eye is focused on as being larger than normal, or closer than normal. This makes judging distance in a high stress situation almost impossible, and it also means that there should never be one technique taught for close distances and a completely different technique taught for longer ranges.
Stress also impairs the ability of the mind to make decisions. This is why basic techniques that require automatic reactions in an emergency such as the grip, stance, sight picture, trigger control, draw from the holster and the reload, must always be taught as simple, basic and repetitious as possible.
The Draw from the Holster
With all the advances in police weapons training, there are still techniques that may be considered ‘old school’ but have worked for years under stress and will continue to work under stress. The best example of this is the draw from the holster.
Trendy alternative methods of the traditional grip, stance, draw and reload have come and (thankfully) gone. Shooting results still prove year after year that the best combination of grip, stance, sight picture and draw from the holster for the average street officer is still the relatively squared-on stance (often called a “modified isosceles”).
Shooting from an interview stance position places the officer relatively square to the threat and leaves the most vulnerable part of their body armour facing away from that same threat. It is also simple and instinctive.
Alternate stances such as the Weaver stance work well for tactical teams but require hundreds of hours of practice to make this an instinctive stance in a high stress situation. They also require tactical body armour that fills vulnerable holes such as the armhole.
The goofiest alternative ever presented as a viable stance was one called the centre-axis relock (CAR) method. Widely panned by nearly every expert in the world, this stupid (and highly unsafe) technique has now pretty much disappeared as a viable training method.
To this day, no one - even the now-extremely rare proponents of this dumb method - have been able to provide an explanation of what the words centre-axis relock actually mean. It was just a cute acronym looking for words. Well, in my opinion, acronyms should make sense. One should invent acronyms that describe the action, not meaningless words that fit the letters.
In 2008, the Threat-Indexed Presentation (TIP) was born.
The Threat Indexed Presentation (TIP)
The principle is to get the front sight on to the threat as quickly, smoothly and consistently as possible. It emphasizes conservation of motion and an identical draw stroke no matter how close or far away the threat is. Provided the immediate threat is arm’s length or farther, constant practice of this method conditions the officer to “index” sights on a target in the quickest and most efficient way possible.
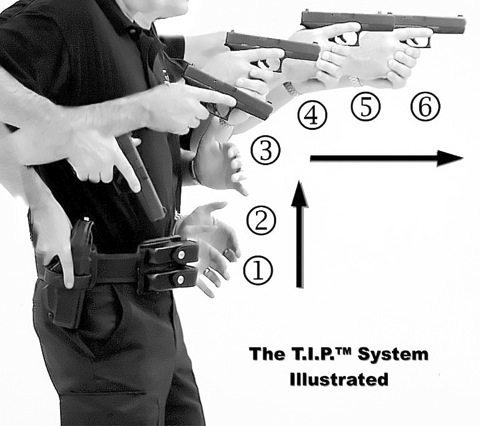
A smooth draw from the holster begins with an upward motion. This is why the shortest distance to the threat is not a straight line from holster to target but rather a sideways “L” shape. The firearm travels initially upward and then outward toward the target. This gets the front sight onto the threat area faster, and if the threat is almost on top of the officer, the firearm can be fired before the stroke is even completed. If the firearm comes out of the holster on a straight line to the threat, the front sight does not become visible to the shooter until the very last fraction of the draw. If the sidearm comes up, then out, the front sight becomes into the line of vision much sooner. Sight alignment now becomes as simple as the rear sight following the front sight that is already indexed on the threat area.
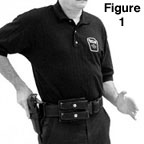
Starting from a ready position, the strong hand acquires a grip on the sidearm and releases the holster retentions as required. To keep both arms moving in unison, the weak arm should now bend at the elbow an angle equivalent to the bend in the strong arm.
Step Two: BREAK
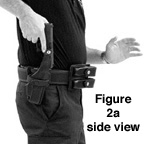
Once the sidearm is released from its retention devices, it should be drawn as close to vertical as possible. It is important to keep the weak hand straight out from the side and not to cross the body until Step Three.
The break is the most critical part of the draw. While there is little to be gained by a fast grip in step one, a smooth break from the holster in step two will result in a fast draw.

To achieve a good draw, one doesn’t practice for speed; one practices for smoothness.
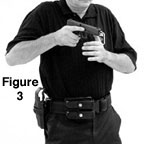
As the sidearm travels vertically, the weak arm parallels it and then moves inward. The two hands meet near the centre of the chest and the handgun is punched forward into the weak hand.
The weak hand forefinger presses tightly underneath the trigger guard at the second joint and both thumbs are aligned along the weak side, clear of the slide.
Step Four: INDEX
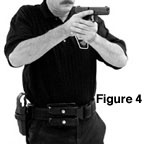
The sidearm rises almost completely vertically first before the arms begin to extend. The sights are now at eye level and if the target is literally on top of you, the handgun can be fired right here. The focus should shift to the front sight, and the front sight itself should be now indexed onto the centre of the target.
Step Five: ACQUIRE
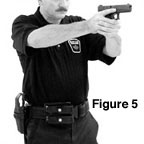
The sights are close to the eye so the notch of the rear sight will appear quite large and a rough sight picture can now be formed. At very close range, this “flash” sight picture will still be acceptably accurate. The vertical rise before the horizontal extension will deliver the sights to eye level and indexed onto the target faster than any other method.
Step Six: EXTEND
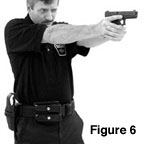
At full extension, the sight picture can be more carefully aligned for a longer-range shot. The basic principle here is that the time taken to precisely line up the sights is directly related to the distance to the threat.
Every shot at greater than arm’s-length requires a correct sight picture. It is a myth that one can fire a handgun accurately at close range by “point-shooting,” or shooting from the hip. Not only is this non-instinctive, but it forces the shooter to artificially terminate a natural draw part way through the stroke, and ends up costing more time as the sights begin to rise to the target; the shooter remembers this was not the exercise and they force themselves to shoot from the hip, resulting in a slow and badly-aimed shot.
Yes, the acronym is entirely unnecessary. It is simply an illustration that fancy acronyms don’t modernize firearms training if the method they spell out don’t work under stress, or worse, expose the weakest part of an officer’s soft body armour directly toward the threat. (Tac officers like to describe doorways and stairwells as being “fatal funnels,” but if you want to see a real fatal funnel, try exposing the arm hole of your body armour toward the threat.)
But whatever you call it, the basic sideways-“L” draw is simple, basic and consistent. The draw stroke is identical whether the threat is half a meter or 20 meters away. This draw is not the best for tactical officers, who for various reasons train more toward a Weaver stance, but for the average street officer who might practice a few hours a year, it is as simple as riding a bicycle.
Dave Brown is a professional firearms trainer and is Firearms Editor for Blue Line Law Enforcement Magazine.