The PROVE Procedure Illustrated
by Dave Brown
“The PROVE Procedure saves lives."
Firearms training is a science. Safety has to be far more than a set of rules and practices passed down from generation to generation. Effective safety training programs don't just teach how to pass tests; they also require a good understanding about how people learn lifetime safety skills.
One of the ways to help learn new skills is to create acronyms to simplify what may first appear to be complicated and intimidating. Our goal in the design of Canada's two firearms safety courses - the Canadian Firearms Safety Course (CFSC) and the Canadian Restricted Firearms Safety Course (CRFSC) - was to use these tools to reinforce procedures that students would remember and practice their whole lives. This is how the Vital Four ACTS of firearms safety and the PROVE safety checking procedure came about and have now been taught to millions of participants.
Born in the classrooms and shooting ranges of Canada, the PROVE Procedure was developed by teaching and subject-matter experts and tested with tens of thousands of learners. The results were clear very early on in the program - the PROVE Procedure could save lives by reinforcing simple, reliable and consistent safety skills every time a firearm is handled.
After all, no one is exempt from the laws of physics. Once a bullet has left the barrel of a firearm, there is no force in the universe that can get it back again.
The History of PROVE
During the redesign of the Canadian Firearms Safety Course and the new Canadian Restricted Firearms Safety Course, various industry partners and subject-matter experts identified the need for simple, basic techniques that could be learned through constant repetition. They emphasized the importance of acronyms to help students remember safety rules and procedures. This is where the four basic rules of firearms safety became The Vital Four ACTS.
In addition, an acronym was suggested that would enhance learning of the actual steps in safety checking any firearm. That became the PROVE Procedure, and is now incorporated into the CFSC, CRFSC and numerous other firearms safety programs around the world.
The PROVE Procedure has also been adopted as the standard safety-checking procedure in other industries such as film and theatre production. In 2016, the PROVE Procedure became part of the firearms safety training program for all IATSE film and theatre technicians across North America. (If the simple PROVE Procedure had been used during filming of “The Crow” in 1993 or “Rust” in 2021, actor Brandon Lee and cinematographer Halyna Hutchins would still be alive today.)
The PROVE Procedure
So what is the PROVE Procedure? In simple terms, PROVE defines the steps to follow every time a firearm is handled. It stands for Point, Remove, Observe, Verify and Examine.
PROVE
- Point the firearm in a safe direction;
- Remove all ammunition;
- Observe the chamber;
- Verify the feeding path;
- Examine the bore for obstructions.
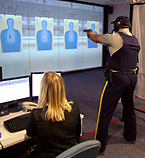
Step one is to point the firearm in the safest direction. This may vary depending on the situation. In the field, a safe direction is where no one is standing or may be standing. At the shooting range, a safe direction is pointed towards the backstop.
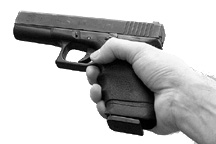
Step two is to remove all ammunition. Ammunition may be found in the chamber and/or the magazine. (The source for spare cartridges.) With a firearm with a detachable magazine, the magazine must always be removed first.
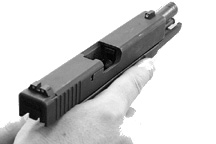
Once the magazine is removed, the action (moving parts) are opened in order to expose the chamber(s). In this example of a modern semi-automatic pistol, the magazine release button is depressed with the right thumb if right-handed, and the trigger finger if left-handed.
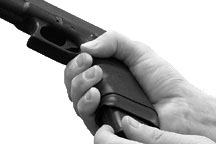
Notice the overhand grasp on the front part of the slide. The shooter should be standing sideways to the line of safe direction, and use an opposing motion with both hands to allow the shooter to lock the slide smoothly to the rear by using leverage instead of upper body strength.
An alternate method taught by some police agencies is to pinch (or “slingshot”) the back of the slide at the rear serrations using the thumb and forefinger of the support hand. Either method works, although my preference is for the overhand grasp as this uses fewer fine motor skills.
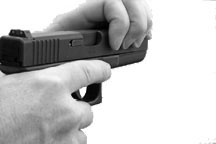
Step three is to observe the chamber is empty. With the cylinder open on a revolver or the action locked back on a semi-automatic, inspect each chamber to ensure no cartridges remain. Do not put your finger inside the action of a semi-automatic. (Actions can bite if the slide stop suddenly slips out of the notch.)
It is critical to remove the magazine BEFORE the action is opened. This avoids a potentially tragic incident that may result by opening the action before removing the magazine. Remember: REMOVE the magazine, LOCK the action to the rear and LOOK inside that chamber!
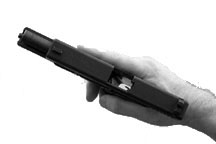
Step four is verify the feeding path. This means to check the path that a cartridge follows from the magazine into or out of the chamber. On a semi-automatic pictured here, once the magazine has been removed, inspect inside the grip for cartridges that may be stuck. On firearms with tubular magazines such as pump action shotguns or lever action rifles, check to ensure that the magazine follower is visible at the very rear of the magazine tube.
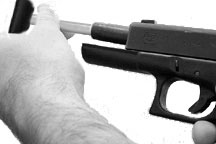
Step five is to examine the bore (inside of the barrel) for obstructions. Due to the tremendous pressure that expels a bullet out the barrel, any obstruction in the barrel would not allow the aerodynamic pressure built up in front of the bullet to be released safely out the muzzle. The result can be a sudden and explosive rupture of the barrel.
The way to prevent this is to examine the full length of the barrel by inserting a cleaning rod down the end, or by visually inspecting it while keeping the firearm pointed in a safe direction.
****
Dave Brown was the professional firearms instructor and subject-matter expert who first coined PROVE as an acronym during the design of the Canadian Firearms Safety Course (CFSC) and Canadian Restricted Firearms Safety Course (CRFSC) in 1999. The PROVE acronym is now an integral part of firearms safety training around the world.
Dave continues to teach firearms safety, responsible handling and advanced shooting skills to police officers, military units and government agencies across Canada.